- Proudly Made in the USA

A Stained Glass Window Kit turns a complex glassmaking process into a more approachable creative project. It usually combines a design pattern, pre-cut or uncut glass, copper foil, solder, flux, and basic instructions. Some packages also include a glass cutter, grozing pliers, brushes, patina, and protective gloves. The contents vary widely. A “complete” kit may still require a soldering iron, safety glasses, ventilation, or a heat-resistant work surface.
Industry research shows why these kits deserve careful explanation. Grand View Research’s Stained Glass Market analysis identifies decorative interiors, restoration, and customized artwork as important demand areas. Meanwhile, Association for Creative Industries reports continue to track strong consumer interest in hands-on craft activities. These reports do not prove that every beginner will succeed quickly. They do show a broader movement toward accessible, tactile making.
Small details matter. A beginner may open a box expecting ready-to-assemble glass, then find sheets requiring accurate cutting. That can be frustrating. It is also where product descriptions need more honesty. The best Stained Glass Window Kit explains glass thickness, tool requirements, project size, safety guidance, and skill level before purchase. Some kits save hours with numbered pieces. Others offer more freedom but demand steadier hands and better measuring.
This guide examines what a kit includes, how each component works, and which supplies may be missing. It also considers practical safety, material quality, and realistic project expectations. Stained glass is beautiful, but it is not effortless. Understanding the box is the first careful step.
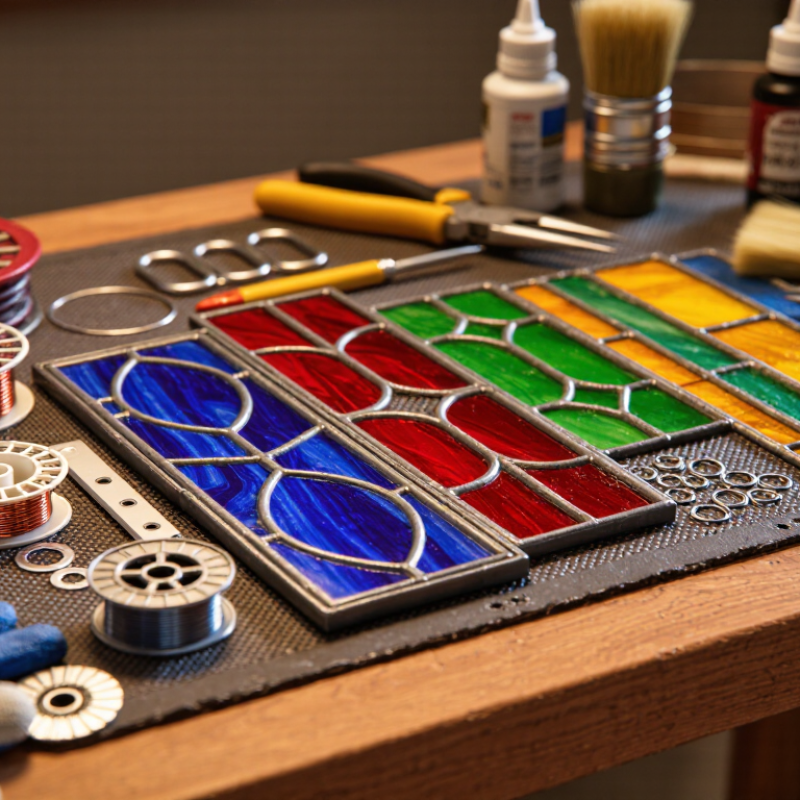
A stained glass window kit is a packaged set for creating a decorative glass panel at home or in a studio. It usually includes pre-cut glass pieces, a paper pattern, copper foil or lead came, solder, flux, and basic finishing materials. Some kits also provide a glass cutter, grozing pliers, soldering iron, gloves, and safety instructions. The exact contents vary, so reading the package list matters.
The kit’s design usually follows a repeatable process. You place each glass piece over the pattern, wrap its edges, join the sections with solder, and clean the finished panel. Beginners should check whether the glass is already cut. Uncut glass requires more control and creates sharper handling risks. A stable work surface, eye protection, ventilation, and careful heat management are essential. Small details matter.
Grand View Research reported that the global arts and crafts market reached about USD 44.8 billion in 2023, with projected growth near 9% annually through 2030. That growth reflects stronger interest in hands-on creative activities, but it does not guarantee every kit is suitable for beginners. A 2024 craft industry survey by the Association for Creative Industries also identified learning support and project accessibility as important purchase factors. In practice, some instructions remain vague. A kit may contain enough materials, yet still leave newcomers unsure about solder temperature or glass alignment. Experienced makers often replace weak tools and test the process on scrap glass first.

A stained glass window kit usually combines colored glass, a design pattern, and basic assembly supplies. The glass may arrive as small sheets, strips, or pre-cut shapes. Textures can range from rippled surfaces to softly opaque finishes. Color and thickness may vary between pieces. That variation is normal.
The core tools often include a glass cutter, running pliers, and grozing pliers. A cutter scores the surface; it does not slice through the glass. Running pliers then separate the piece along that score line. Grozing pliers remove tiny excess chips and refine uneven edges. Many kits also contain copper foil, burnishing tools, solder, flux, and a small brush. Some include a compact glass grinder, though others expect you to purchase one separately. Check the contents carefully. My first kit lacked enough foil, which slowed the project.
Protective equipment matters. Use safety glasses, closed shoes, and cut-resistant gloves when handling sharp pieces. Soldering requires steady ventilation, a heat-resistant work surface, and an appropriate soldering iron. If the solder contains lead, follow its handling instructions and wash your hands afterward. A damp sponge helps clean the iron tip, while a ruler, marker, and masking tape improve accuracy. Kits may not include these simple tools. Measure twice. Cut once. Even then, a small gap can appear, and correcting it is part of learning stained glass.
A stained glass window kit usually includes pre-cut or printable patterns, colored glass, a glass cutter, grozing pliers, copper foil, solder, and safety equipment. The exact contents vary, so check the tool list before starting. Some kits provide rough glass pieces, while others require you to cut every shape yourself.
The copper foil technique wraps each glass edge with adhesive-backed copper tape. After burnishing the tape firmly, you apply flux and solder along the seams. The solder joins the pieces and creates the dark, raised lines seen in many small panels. Lead came uses H-shaped metal channels instead. Glass pieces fit inside the channels, then the joints are soldered. This method suits larger designs, but accurate measuring matters more. A loose fit can make the panel shift. My first attempt had uneven foil, and I had to remove several sections. That mistake taught me to slow down.
Tips: Score the glass once with steady pressure, then break it carefully with grozing pliers. Wear eye protection and keep your work area ventilated. Test solder on scrap glass first. Copper foil forgives small curves, but it does not hide careless cleaning. Keep the iron tip tinned, and avoid touching freshly soldered seams. Be patient. The neatest lines often come from shorter solder passes. Some beginners polish the finished panel immediately, but waiting allows the joints to cool fully and reduces accidental marks.
| Category | Item or Technique | Purpose and How It Works | Typical Kit Inclusion or Use | Important Notes |
|---|---|---|---|---|
| Stained Glass Window Kit Components | ||||
| Design | Pattern or Template | A full-size guide used to number, cut, and assemble each glass piece. The pattern normally includes seam allowances for the chosen construction method. | Usually included Printed or downloadable pattern | A pattern helps maintain accurate shapes and consistent panel dimensions. |
| Glass | Colored or Textured Glass | Flat sheets of soda-lime glass selected for color, transparency, texture, and light transmission. Pieces are cut to match the pattern. | Often included Preselected sheets or precut pieces | Glass edges are sharp and should be handled with protective equipment. |
| Cutting | Glass Cutter | A small hardened wheel scores the glass surface. The scored line creates a controlled path for breaking the glass. | Common in tool kits Wheel cutter and cutting oil may be supplied | A score is not a deep cut; excessive pressure can cause unwanted breaks. |
| Shaping | Running Pliers and Grozing Pliers | Running pliers help open a scored line, while grozing pliers nibble away small irregularities and refine the edge. | Sometimes included Frequently purchased separately | Use controlled pressure to reduce chips and accidental fractures. |
| Assembly | Copper Foil | Adhesive-backed copper tape is wrapped around the edges of individual glass pieces. The foil creates a metal surface that can be soldered. | Included in foil kits Tape, burnishing tool, and pattern materials | Foil width should match the intended joint width and glass thickness. |
| Assembly | Lead Came | Lead came consists of H-shaped or U-shaped metal channels that hold glass pieces together. Sections are joined at intersections by solder. | Usually separate Used for larger or traditionally styled panels | Lead came requires careful handling, clean work practices, and suitable ventilation. |
| Joining | Solder, Flux, and Soldering Iron | Flux helps solder flow over clean metal surfaces. A heated soldering iron melts solder to create permanent joints between copper-foiled or lead-came sections. | May be included Often sold as an advanced-kit component | The iron and molten solder can cause burns; use heat-resistant and ventilated work areas. |
| Finishing | Patina and Finishing Materials | Patina chemically changes the color of solder or came, commonly producing a dark or aged appearance. Cleaning materials remove flux residue afterward. | Optional More common in complete project kits | Follow the product safety instructions and protect nearby surfaces. |
| Safety | Protective Equipment | Safety glasses, closed-toe footwear, suitable gloves, and good ventilation help reduce risks from glass fragments, flux fumes, and hot tools. | Not always included Should be prepared separately if absent | Safety equipment is part of the working setup, even when it is not packaged in the kit. |
| Main Stained Glass Techniques | ||||
| Construction | Copper Foil Technique | Glass pieces are cut, their edges are wrapped with copper foil, and the foil-covered seams are soldered together. The method works well for intricate shapes and detailed designs. | Best for detailed panels Common in beginner projects | The finished panel generally needs a rigid border or reinforcing structure. |
| Construction | Lead Came Technique | Cut glass pieces are fitted into metal channels. The channels are aligned and soldered at their joints, then cement or another waterproofing compound may be applied. | Best for traditional panels Efficient for larger geometric sections | The design usually uses simpler shapes than copper-foil work. |
| Joining | Soldering | Soldering joins metal surfaces rather than bonding glass directly. Heat melts the solder, which cools into a solid seam after flowing across the prepared joint. | Required for foil and came Needs an iron, flux, and solder | Clean metal, suitable heat, and controlled movement are essential for even seams. |
| Glass Decoration | Glass Painting and Enameling | Special glass paints or enamels are applied to the surface and fired in a kiln so the material bonds to the glass. They can add lines, shadows, details, or opaque areas. | Specialized technique Requires compatible paint and kiln firing | Ordinary craft paint is not a substitute for kiln-fired glass color. |
| Glass Forming | Glass Fusing | Compatible glass pieces are placed together and heated in a kiln until they soften and fuse. Additional firing cycles can shape or flatten the result. | Separate kiln process Not normally part of a basic window kit | Glass compatibility is critical because different expansion rates can cause cracking. |
| Surface Design | Etching and Engraving | Etching uses an abrasive or chemical process to create a frosted surface, while engraving mechanically removes or marks glass to form lines and textures. | Optional advanced work Usually requires dedicated tools and controls | Chemical etching requires appropriate ventilation, protective equipment, and strict handling procedures. |
A stained glass window kit usually contains a pattern, glass pieces, copper foil, solder, flux, and basic tools. Some kits include pre-cut glass, while others require careful cutting and grinding. Read the project instructions before opening the materials. Check each piece against the pattern, because one misplaced shape can affect the entire panel.
Begin by laying the glass pieces on a flat, protected surface. Keep the printed pattern nearby. Clean and dry every piece before applying copper foil around its edges. Press the foil firmly with a burnishing tool, especially at the corners. Poorly sealed foil may lift during soldering. It happens easily. Arrange the pieces again, then use small solder points to hold the design together. Work slowly along the seams, keeping the solder line even. Good ventilation, safety glasses, and heat-resistant protection are essential.
My first panel looked neat from a distance, but several joints were uneven. I had rushed the final soldering pass. A better method is testing the iron and solder on scrap glass first. Do not force pieces into place; small gaps can often be adjusted, but cracked glass cannot. After soldering, remove flux residue according to the kit instructions and inspect every joint. Add suitable hanging hardware only after the panel feels stable. If the kit includes a grinder, use light pressure and keep the glass surface wet as directed. Practice improves control, but patience matters more.
A stained glass window kit typically combines a pattern with materials and tools for cutting, foiling, soldering, and finishing a small project.
The chart shows typical planning estimates for a beginner-sized project. A kit commonly includes a pattern, glass pieces, copper foil, solder, flux, and finishing supplies; a glass cutter, soldering iron, and safety equipment may need to be purchased separately. Actual times vary with project size and experience.
A stained glass window kit usually combines pre-cut glass, a pattern, copper foil, solder, flux, and basic tools. Some sets also include gloves, cleaning pads, a glass cutter, or a small soldering iron. Before buying, read the inventory carefully. A low price may hide missing essentials. Check whether the soldering iron has adjustable temperature and a stable stand. Those details affect control, safety, and the final join.
Beginners should match the project to their available workspace. You need ventilation, a heat-resistant surface, bright lighting, and room for sharp glass edges. Never work near loose fabric, food, or children. I learned that a tiny cutting mat becomes frustrating when pieces spread across the table. Choose a simple pattern with fewer pieces and clear instructions. Check the finished size too. A large panel needs stronger support and more patience. Look for accurate diagrams, material measurements, and safety guidance from a credible seller or instructor. Reviews can help, but confirm details against the actual product list.
Consider the glass itself. Transparent glass shows errors easily, while textured glass can soften uneven cuts. Ask whether colors and textures are mixed intentionally or selected randomly. Confirm replacement-glass availability before purchasing. Foil width matters, especially around narrow shapes. Some beginners assume every tool is reusable. That is not always true. Flux, blades, and polishing materials may need replenishing. My first project was messier than expected, and the corners were uneven. That mistake taught me to value clear instructions over impressive photographs. A kit should support learning, not only promise a beautiful window.
Whether you’re looking for fire-rated walls, doors, openings, floors or a specialty service, we have the solution for you. With over 40 years of experience in testing, innovating, and providing technologically advanced fire-rated glass and framing products, we deliver unyielding performance and quality at a competitive price.
